
A Bitcoin 101 Console App Demo Using C#, .NET, and NBitcoin on the RegTest Network
This article is a 101 level walkthrough of getting started programming on top of the Bitcoin network with Windows, .NET, C#, and the NBitcoin library.
There is a lot to learn when starting on Bitcoin. I work most with C#/.NET/Windows and whenever possible like “seeing” things on the screen and clicking around with a GUI, an interactive console, and Postman. In that spirit, we’ll walk through some programming examples using only these platforms to reduce the number of learning variables.
In the article below, we’ll setup a local development to use Bitcoin Core on Windows, add in environment variables to be able to use the RegTest network, build a local Console program that can connect to a bitcoin node, create wallets and addresses, send and receive transactions, and analyze the local network. All while being able to see the programmatic results in the Bitcoin UI locally and all leveraging the NBitcoin library.
The full code and console app is available here:
 apleroy
Acknowledgements and Prerequisite Reading
Before going further, I want to highlight that all of the work in this tutorial is built on top of the NBitcoin library, book, and examples by Nicolas Dorier and @nopara73. It is incredible to have a full C# and .NET library for Bitcoin Core with all of the examples they have provided. Everything below is me “learning by doing and writing about it” as gleaned from these resources:
MetacoSAThis sample app would also not be possible without the incredible book by Andreas Antonopoulos. This book is one of the best resources I have come across that goes step by step into all details of bitcoin and its blockchain.
bitcoinbookBefore starting with this tutorial, I would highly recommend heading over to these resources if you haven't already.
Why Bitcoin?
If you are reading this, I assume you have various reasons for getting started with Bitcoin. Here are just a few I have found helpful:
- The Bitcoin Standard - gives insight to the history of money, its role in society, and the role of central banks historically - and the economic outcomes we have seen to various decisions they have made.
- What is Money? (self promotional) articles and video resources - with linked sources - on the role money has played in our society
- How is Money Created? (another self promotional) article and video resources on how money is created - and the resulting inflation and other issues we see as a result.
- What does a global, instant payment network offer for reducing the fees associated with remittance payments?
We’re often asked by policymakers about meaningful use cases in the cryptoeconomy. One of the most powerful examples is remittances.
— Faryar Shirzad (@faryarshirzad) February 16, 2022
- Should Government and Central Banks be able to create and manage the control and supply of money?
Part I - Setting Up Your Local Bitcoin Environment (RegTest)
Bitcoin has three networks:
- MainNet - this is the real, full network, run by thousands of validator nodes, and millions of miners. Any transaction here involves real money.
- TestNet - the TestNet is designed to simulate the full MainNet network - it involves full connections with peers - with less validators and miners securing the network. Any transactions here involve test Bitcoin, which has no real monetary value.
- RegTest - offers full control over a local blockchain, where mining can be done on command. There is no communication with any other peers and no monetary value to the local network.
Throughout this tutorial, we will use the RegTest network. Note that there are also node-as-a-service providers such as QuickNode that can facilitate on demand development and deployment resources for using the underlying Bitcoin network.
To get started, head to the bitcoin.org site and download Bitcoin - as mentioned earlier, we will use Windows throughout the tutorial with Bitcoin v22.0.
Follow all of the setup steps and defaults for setting up Bitcoin Core. We will also make use of the Bitcoin Core UI throughout this article.
Once downloaded, you have the option to begin syncing with other peers to download the full blockchain history. This can take several days and requires several hundred GB of space. For purposes of getting started this is not necessary, and you can pause the sync.
To get started with Bitcoin RegTest, you’ll need to modify your configuration file so that Bitcoin Core knows to go into RegTest mode. To do this, browse in the UI like below to open the config file - which can be edited in notepad.
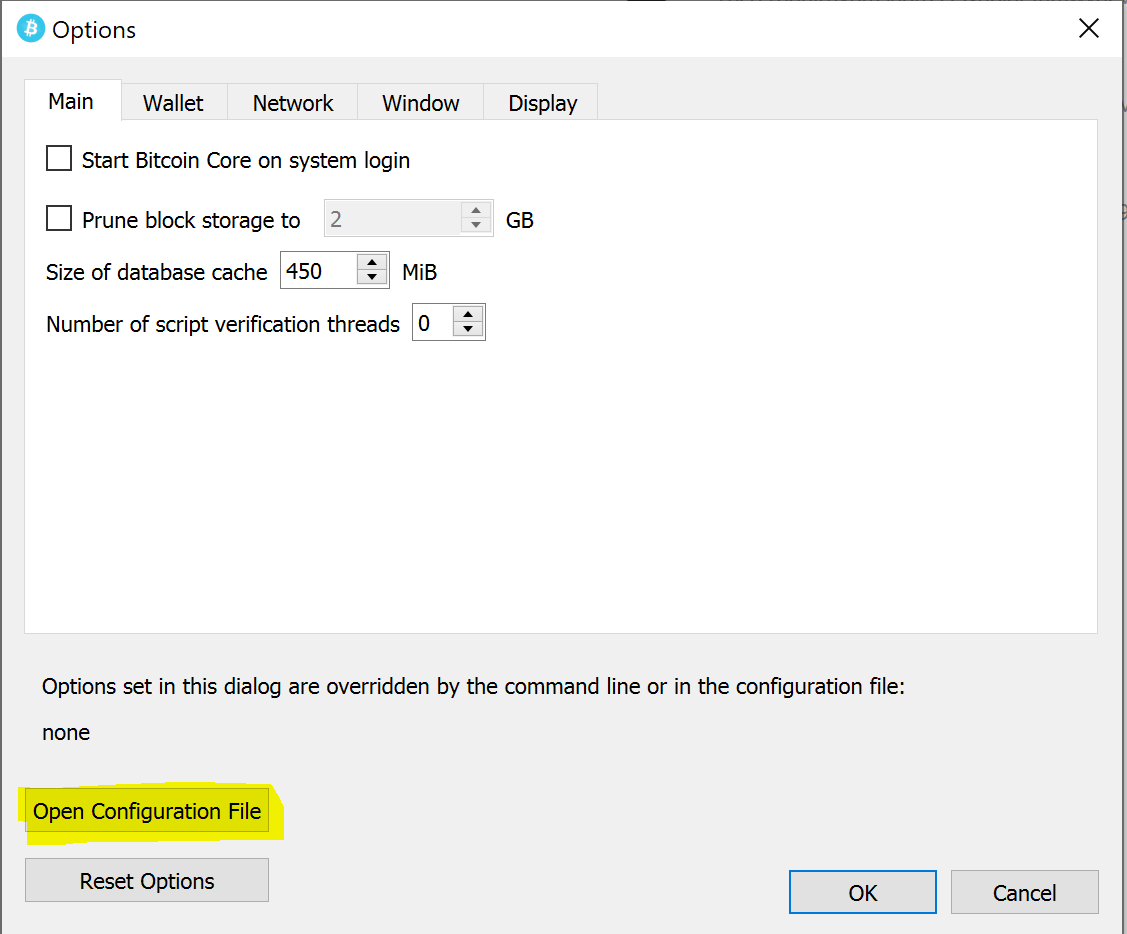
Add the following details below - and change to whatever username/pw you would like to use. Save the file and close out of Bitcoin Core. Reopen the application and you should see it open in a blue RegTest mode.
regtest=1
server=1
rpcallowip=127.0.0.1
rpcuser=YourRpcUsername
rpcpassword=YourRpcPassword
fallbackfee=0.0002


[regtest]
rpcport=18332
You can also see the configuration file in your local Bitcoin core directory. For RegTest, the settings are stored in:
C:\Users\<YourUserName>\AppData\Roaming\Bitcoin\regtestWith RegTest setup locally, you can use the UI to test manually creating a wallet. We’ll go through some additional example actions below.
Part II - Making an API Call to Your Local Bitcoin Network
Now that RegTest is setup locally, there are a number of ways to call into your RegTest Bitcoin node. Bitcoin Core offers an RPC (Remote Procedure Call) interface that can be invoked via HTTP (and JSON). Note that because everything is set, invoked on the Bitcoin Node, and returned, all calls will be of HTTP form POST. For all of the below to work, your Bitcoin Node must be running.
Bitcoin Console UI
In the UI, browse to Window > Console like below.
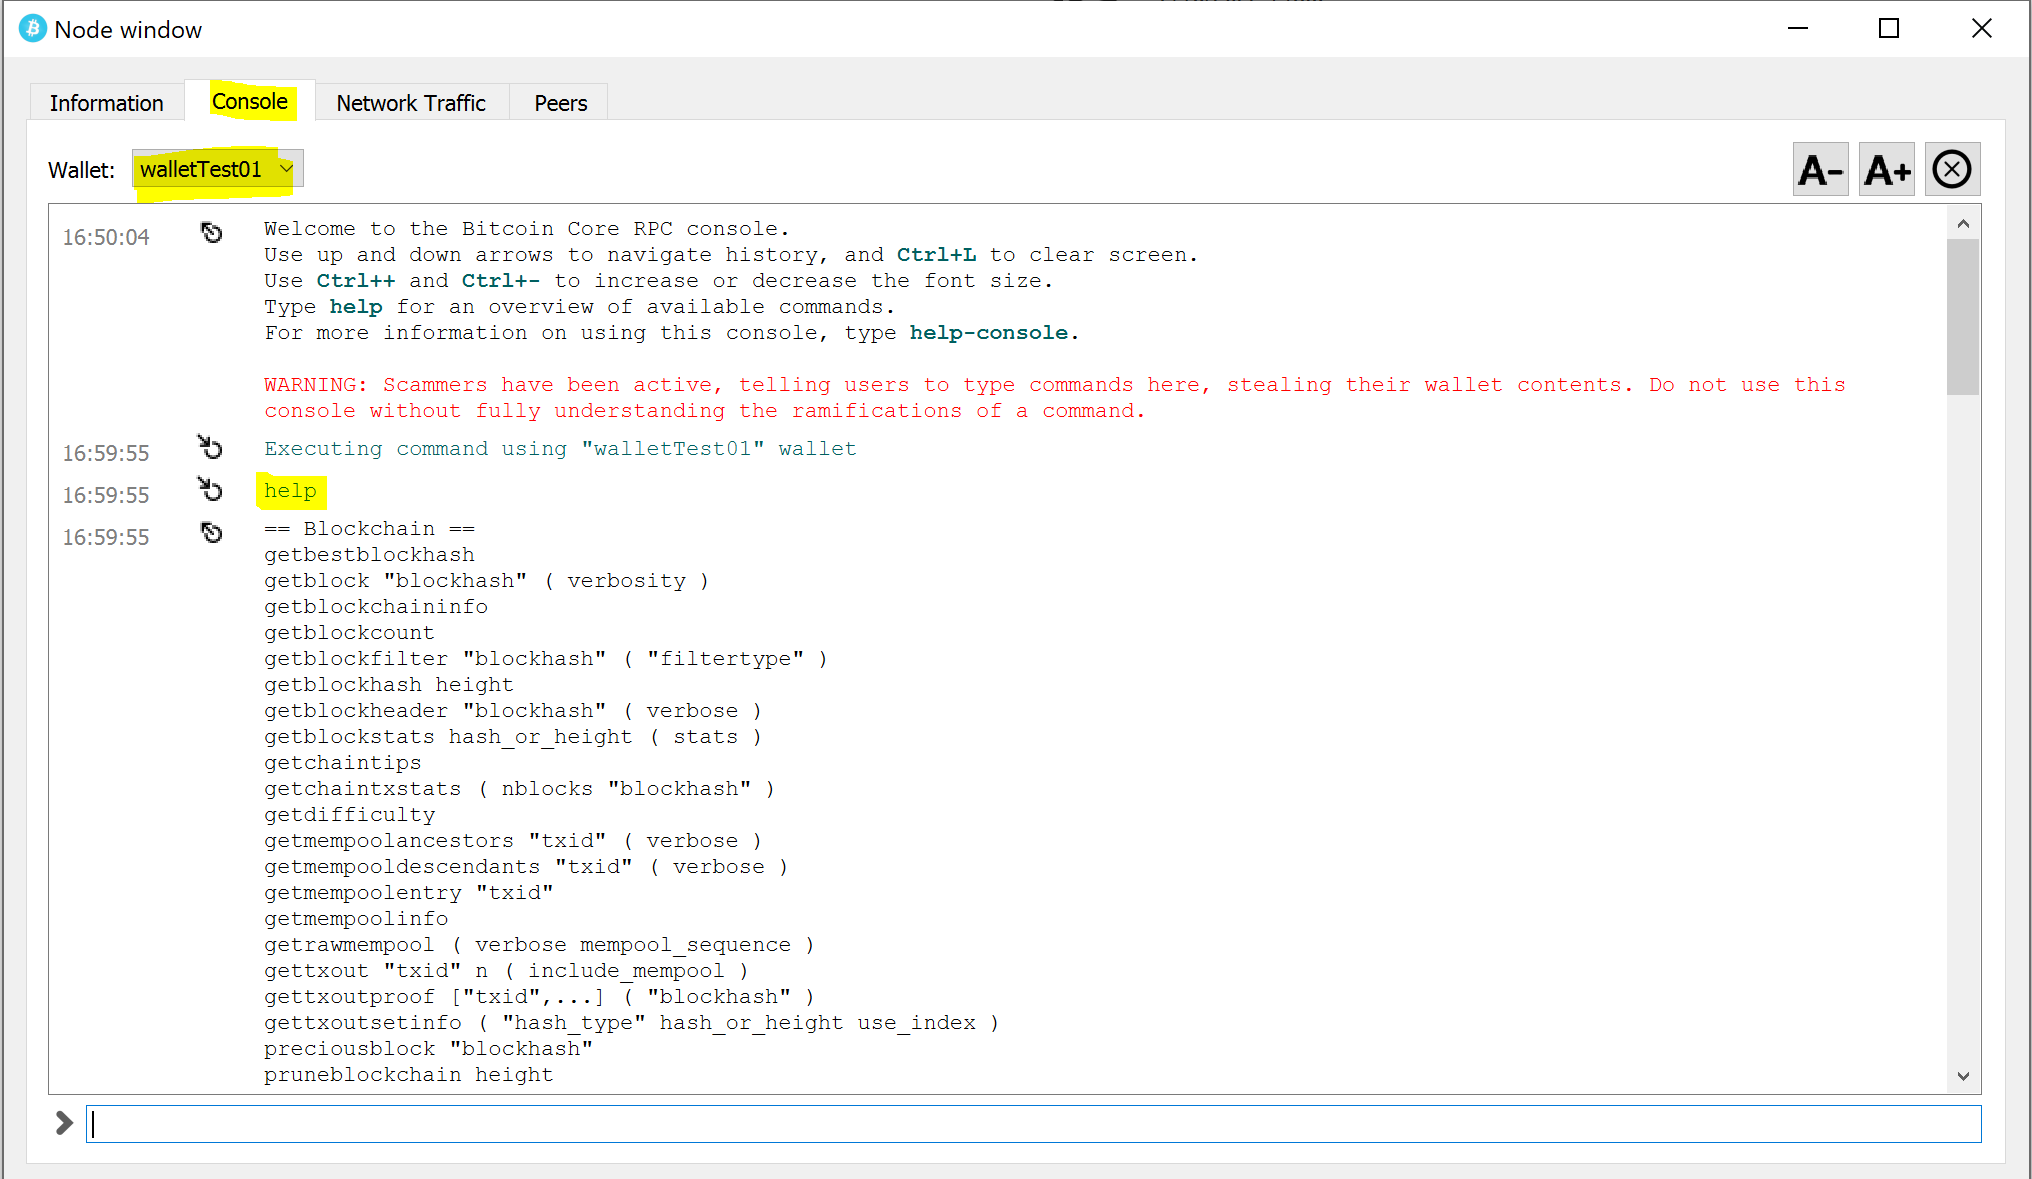
Here you can type help or any other commands. Note that for many of the wallet commands, you will need to ensure the correct Wallet is selected in the dropdown.
Postman
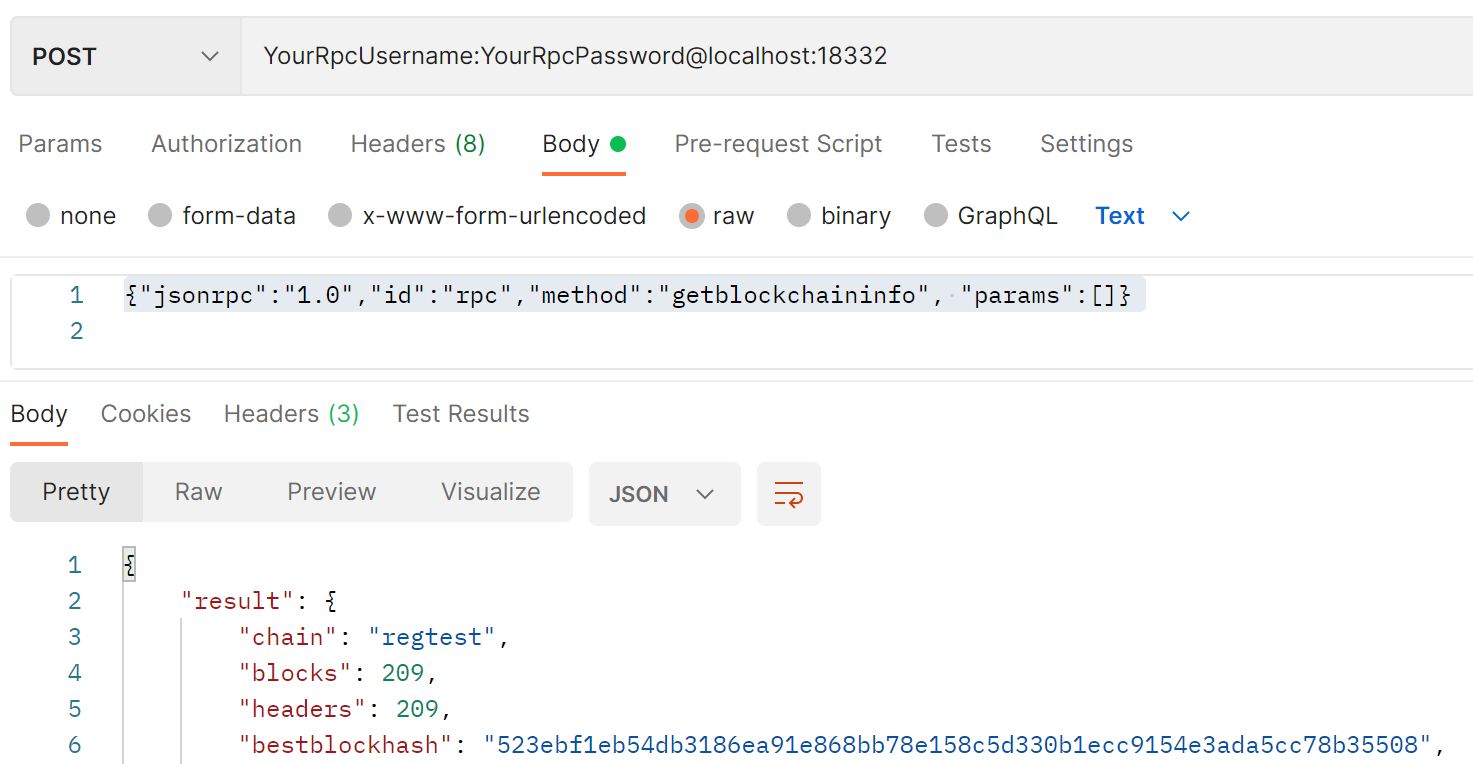
Because the RPC API accepts HTTP requests and returns JSON responses, we can use Postman locally.
An example request would be type POST to an address like: YourRpcUsername:YourRpcPassword@localhost:18332 with a raw body like:
{"jsonrpc":"1.0","id":"rpc","method":"getblockchaininfo", "params":[]}
For a wallet specific command, the request would look like:
POST YourRpcUsername:YourRpcPassword@localhost:18332/wallet/walletTest01
{"jsonrpc":"1.0","id":"rpc","method":"listunspent", "params":[]}
Command Line
You can also run a shell locally and access the command line interface (while the UI is open or you ran the bitcoind in a separate terminal). For example from PowerShell:
C:\Program Files\Bitcoin\daemon> .\bitcoin-cli.exe getblockchaininfo
Part III - Setting up Your .NET Console Application
Now that we know how to invoke HTTP calls against Bitcoin, we will set this up programmatically in a .NET Console Application. All of the code in this new sample console app is available here.
You can see that NBitcoin has been forked and we have all of the source locally within the solution.
The first step is to create a new Console App. In this example, we use .NET 5. In this console application, we are working with the NBitcoin library cloned locally. However, this would also work by adding it as a Nuget Package. We also downloaded Nuget packages for Microsoft.Extensions.Configuration.
After setting up the Console Program, we use the NBitcoin library to instantiate an HTTP connection to our local Bitcoin RPC Server.
Network network = Network.RegTest;

IConfiguration config = new ConfigurationBuilder()
				.AddJsonFile("appsettings.json")
				.AddEnvironmentVariables()
				.Build();

Settings settings = config.GetRequiredSection("Settings").Get<Settings>();

Console.WriteLine($"Connecting to {network.Name}");

RPCClient rpcClientInitial = SetupRpcClient(settings, network);
Make sure that your variables in appsettings.json match that of the RegTest settings file you created earlier - the port, username, and password must all match. You can see too that we are connecting to the RegTest Network.
At this point you can run the console program and connect to your local instance. The NBitcoin library provides class libraries to create and handle all RPC methods exposed by the Bitcoin RPC Server.
How the blockchain works is out of scope for this article, but you can see some network information using the code snippets here.
// get blockchain information
BlockchainInfo blockchainInfo = rpcClientInitial.GetBlockchainInfo();
Console.WriteLine($"Blockchain Blocks: {blockchainInfo.Blocks}");
Console.WriteLine($"Blockchain Mining Difficulty: {blockchainInfo.Difficulty}");
Console.WriteLine($"Blockchain Best Blockhash:{blockchainInfo.BestBlockHash}");
Console.WriteLine();
Part IV - Private Keys, Public Keys, Addresses, and Wallets
At a basic level, the Bitcoin Blockchain is an accounting ledger system that is stored on each node. Protocols exist for how units of account (bitcoin) are created and how they are transacted and recorded.
Bitcoin Addresses are the interface for sending and receiving money. An address is comprised of a private key, which is paired with a derived public key via complex math. From here, a bitcoin address is a custom Base58 hash of a public key (with some extra math).
A Wallet is a collection of private keys, which can be used to derive multiple addresses. There are different types of wallets, and again some complex math that makes it all work.
Contrary to what I thought in the beginning, a Bitcoin Address does not have to be ‘registered’ with a server anywhere. An address can be created offline and can receive bitcoin at any time. To spend the bitcoin that has been sent to an address, a private key signature is needed to prove ownership of the address, and any coins associated with it.
The NBitcoin library (and the underlying Bitcoin Core protocols) offer a couple of ways to create a new Bitcoin address. We can create addresses manually - creating the private key and adding it to our wallet. Or we can invoke the API call from a wallet to create the address (and underlying private key and public key).
// create two new wallets (to hold private keys, public keys, addresses)string walletName1 = "walletTest01";
string walletName2 = "walletTest02";rpcClientInitial.CreateWallet(walletName1);rpcClientInitial.CreateWallet(walletName2);

// initialize new clients with the wallet name prefixed
RPCClient rpcClientWallet1 = SetupRpcClient(settings, network, walletName1);
RPCClient rpcClientWallet2 = SetupRpcClient(settings, network, walletName2);

// manually create a private key, public key, and bitcoin address in the first wallet
Key privateKey = new Key();
Console.WriteLine($"New Key created: Private Key: {privateKey.GetWif(network)}");

PubKey publicKey = privateKey.PubKey;
Console.WriteLine($"Public Key: {publicKey}");

BitcoinAddress bitcoinAddressManuallyCreatedWallet1 = publicKey.GetAddress(ScriptPubKeyType.Segwit, network);
Console.WriteLine($"Manually Created Private Key/Public Key and Bitcoin Address: {bitcoinAddressManuallyCreatedWallet1.ToString()}");
Console.WriteLine();
rpcClientWallet1.ImportPrivKey(new BitcoinSecret(privateKey, network));

// or create an address with private key, public key creation abstracted away
BitcoinAddress bitcoinAddressAutoGeneratedWallet1 = rpcClientWallet1.GetNewAddress();
Console.WriteLine($"Wallet generated Bitcoin Address: {bitcoinAddressAutoGeneratedWallet1.ToString()}");
Console.WriteLine();
Part V - Mining
All Bitcoin ever created comes from the process of mining. In Bitcoin this is completed by a computer (GPU/ASIC) attempting to find the valid input that has a hashed output that is less than the algorithmically generated target hash. This input is then verified by all running nodes, and the miner is given a block reward and transaction fees.
The Bitcoin RegTest is different from MainNet and TestNet in that there are no peers or mining. Everything is simulated locally, and there are API calls for programmatically simulating the mining of a block.
To ‘get’ Bitcoin so that we can make a transaction, we will need to ‘mine’ some bitcoin to our account. RegTest exposes an RPC method specifically for generating Bitcoin. 100 blocks must be mined before the block reward can be spent.
// generate blocks as a reward to each of the created addresses
// (100 blocks must be created before rewards from mining are available to spend)
rpcClientWallet1.GenerateToAddress(101, bitcoinAddressManuallyCreatedWallet1);
rpcClientWallet1.GenerateToAddress(101, bitcoinAddressAutoGeneratedWallet1);
Console.WriteLine($"Wallet1 Balance: {rpcClientWallet1.GetBalance()}");
Console.WriteLine();
Part VI - Transactions
Every bitcoin transaction ever made is recorded on the global ledger. At a basic level, each transaction consists of inputs, which are a combination of unspent coins associated with an address(es) and outputs, which are the destination address(es). Bitcoin transactions typically have at least two output addresses - one address that is the ‘destination’ for funds, and one address, which represents the leftover ‘change’. Any additional coins will be taken as a fee for the miners.
bitcoinbookFor example, if we have 2 Bitcoins associated with an address (A) and want to send 1 Bitcoin to Address (B), then the transaction will include the 1 Bitcoin from A, and the two outputs would be 1 Bitcoin to B, and 1 Bitcoin (the leftover) back to A (which is actually captured in a new deposit to address C). There would also be fees, so the leftover change would not fully add to 1.
In this console app, we create a basic transaction using the Bitcoin Core API. This method (and the NBitcoin library) abstract away many of the details.
// generate an address for wallet2 so that we can send it bitcoin in a transaction
BitcoinAddress bitcoinAddressAutoGeneratedWallet2 = rpcClientWallet2.GetNewAddress();

// send 1 bitcoin from wallet1 to wallet2
SendToAddressParameters sendToAddressParameters = new SendToAddressParameters
{
	Comment = "Test transaction from Wallet1 address to Wallet2 address",
	SubstractFeeFromAmount = true,
	FeeRate = new FeeRate(Money.Satoshis(1001))
};
uint256 transactionFromWallet1toWallet2 = rpcClientWallet1.SendToAddress(bitcoinAddressAutoGeneratedWallet2, Money.Coins(1m), sendToAddressParameters);

// simulate the mining of a block so that the transaction is finalized
// it takes six block confirmations before the bitcoin transaction money is fully available
rpcClientWallet1.GenerateToAddress(1, bitcoinAddressManuallyCreatedWallet1);

// use any client to see the details of the block transaction
GetTxOutResponse txOutResponse = rpcClientInitial.GetTxOut(transactionFromWallet1toWallet2, 0);
Console.WriteLine($"Transaction {transactionFromWallet1toWallet2} confirmed with {txOutResponse.Confirmations} confirmations");
Console.WriteLine($"Transaction money: {txOutResponse.TxOut.Value.ToString()}");
Console.WriteLine();

// see that Wallet2 has an increased balance (from receiving funds in the transaction)
Console.WriteLine($"Wallet2 Balance: {rpcClientWallet2.GetBalance()}");
After sending the transaction, you can see the Bitcoin UI in Wallet 1 be decremented, and the Wallet 2 balance incremented.
The transaction is seen in the UI, and can be programmatically accessed from its transaction id.
It is worth noting that the leftover change address that was created in Wallet1 is actually hidden in the UI. To see the details, an API/CLI call must be made like below, which shows all of the details. In this case we see 1 bitcoin (less the transaction fee) confirmed with the output address of wallet 2.
gettxout "df1e4935ca9ed6291054472e9f96386674a294f9847efd3a5559eca8ed876cbf" 0
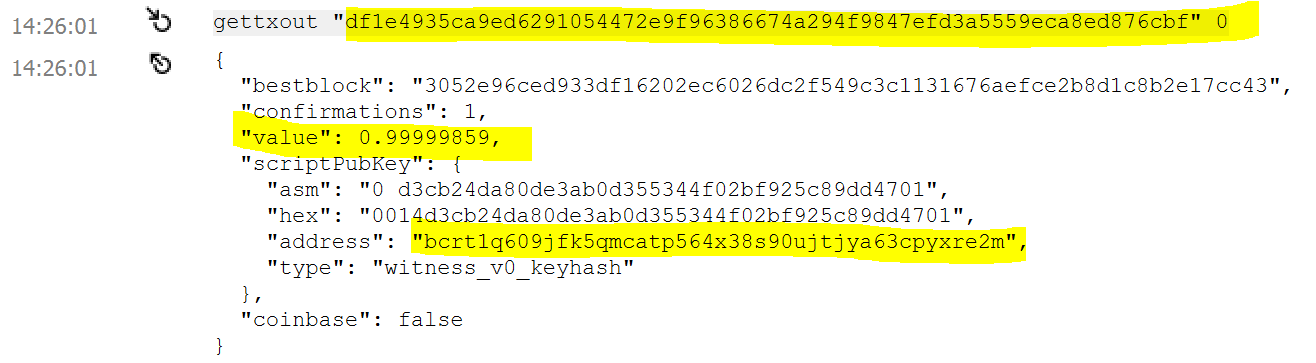
In the example, Address 1 had 50 Btc (through the mining) and when sending that amount to Address 2, there is 'change' of 49 bitcoin that needs to go back to Wallet1. This is not seen in the Bitcoin Core UI. A new address is created for the 49 Bitcoin refund, but it is hidden in the UI. We can make the same API call with index position 1 to see the details of the 'hidden' address that the UI sums when displaying totals in each wallet:
gettxout "df1e4935ca9ed6291054472e9f96386674a294f9847efd3a5559eca8ed876cbf" 1
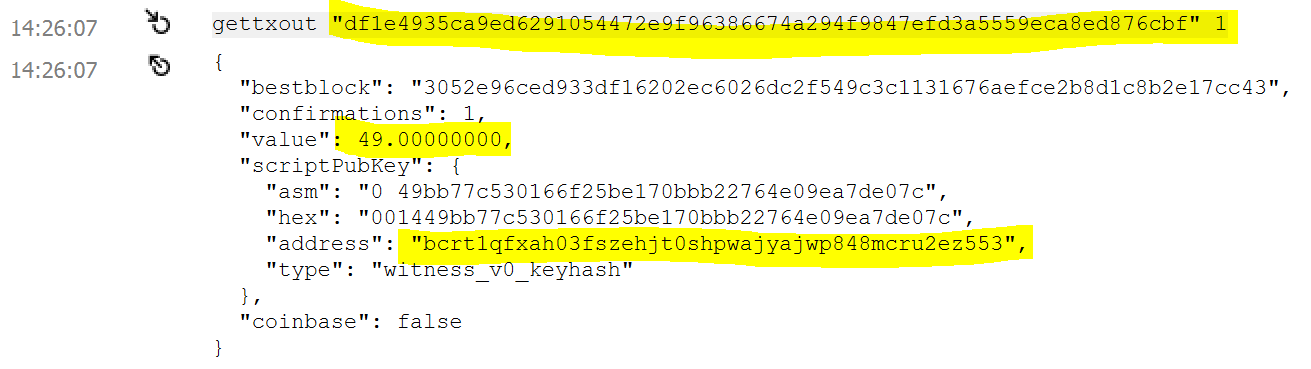
These details could also be seen in a blockexplorer - and we'll revisit that as we get to TestNet (future article).
Part VII - Conclusion and Closing Resources
A couple of closing details...
At any point you can restart your RegTest node. You can reset all data by simply deleting the regtest directory like outlined here.
TestNet requires downloading Bitcoin Core and setting up for TestNet (future article with config like here):
testnet=1
server=1
rpcallowip=127.0.0.1
rpcuser=YourRpcUsername
rpcpassword=YourRpcPassword
fallbackfee=0.0002

[test]
rpcbind=127.0.0.1
rpcport=18332
This post just gets started scratching the surface with Bitcoin. But now we have a way to programmatically interface with a local RegTest node and we can simulate common actions on our own private bitcoin blockchain.
The console app here is a very procedural way of coding against Bitcoin Core so that we can see the result in the UI. The tests here (again in the NBitcoin library) have some good examples of programmatically downloading the source, creating multiple node instances, and transacting:
ProgrammingBlockchainMetacoSAThanks again to https://twitter.com/NicolasDorier and https://twitter.com/nopara73 for creating the NBitcoin library and learning resources. And to Andreas Antonopoulos for open sourcing his Bitcoin book https://github.com/bitcoinbook/bitcoinbook 🙏📈
If you enjoy this kind of content, please subscribe to the Exponential Layers newsletter and YouTube channel to get all updates on new videos and articles.

Comments ()